Blog by Amit Apple
So you already took the first step and created your own Windows 8 App backend in Azure.
You've added windows live authentication and have your own Users table.
You've even added a couple of server-side scripts, for example to limit a read operation on your table to get only items related to the current authenticated user.
But now you want to have some administration control over your data.
One way to do it is to create an admin Windows 8 app that uses the Azure mobile service sdk which I find currently as the simplest way.
But there is one glitch, since your permissions might be set to User Authenticated (for user related tables) you actually need to login to get that table and even if you do login, your script will only return that user's related rows only.
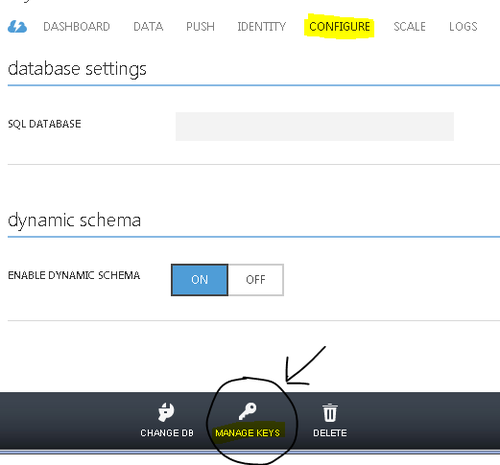
Use your master key (you can find it under Configure --> Manage Keys) to get administrator privileges, the master key is added as a header to the http request made to your mobile service and allows you to access any of your tables configured with any permission.
Add "noScript=true" as a query parameter to the http request made to your mobile service, this (must be accompanied with the master key) will disable the server-side script which allows you to handle raw table data.
Getting to the Master Key:

In order to alter the http request as required by the solution we'll use the IServiceFilter interface from the Mobile Services SDK which allows us to hook up to all requests made by the SDK to our mobile service just before they are sent.
Here is the code:
And to link the filter:
A word of caution - do not publish an app with the master key as users of your app may get to it.
In this post I'm going to write about building a simple Windows 8 app for administration of a Windows Azure mobile service.
This app will allow us to view all of our mobile service tables with added options to delete and edit rows.
Disclaimer: The code in my post will focus more on how to use the Windows Azure mobile services SDK to create administration apps and less on Windows 8 client code.
The first thing we want to do in an admin app is have full access to your tables, the way to do that is by using your mobile service master key as mentioned in a previous post.
We wouldn't want to store the master key in our app's code so we actually use it as a pin for our app to let only users that know the master key actually be able to use this app.
So we're creating a master key input page that will show first.
Next we want a generic way to get rows from whatever table is in our mobile service, for that we'll use the un-typed MobileServiceClient.GetTable() to get a mobile service table (IMobileServiceTable) with un-typed operations like: ReadAsync which gets as an input the odata query (empty string for all rows) and returns the rows as Json (IJsonValue).
Except for read there are un-typed versions for update, delete and insert, those are getting a JsonObject as an input, in our sample we use delete and update, for delete we pass the JsonObject we want to delete from the Json array of rows we read, for update we pass that JsonObject with altered values by what we want to update.
Once we know all that what is left for us to do in our admin app is to create the client code that uses this, so in order to bind the Json results to our generic table (two way bind to allow editing) we need some wrapper class over the results.
In our main page we'll create a dynamic table that can bind to our MobileServiceTableItems and add delete, update and refresh app bar buttons.
And add all other code-behind implementations.
You can find the entire project in this link.