
Blog by Amit Apple
Recently Azure Websites were renamed to Azure Web Apps, I've applied (or at least tried to apply) this rename to my blog posts.
One more concept that was renamed is Web Hosting Plan (also known as Server Farm) renamed to App Service Plan.
One of the premium features you get when using Azure Web Apps in a standard SKU is the deployment slots feature also known as staged deployment but it is actually more than that.
In this post I will go over the deployment slots concept and what you can do with it.

From a (standard) website you can create deployment slots which will actually be Azure Web App instances that are tied to that Website.
A deployment slot will carry the name of the Azure Web App + the name of the slot, for example:
If my Azure Web App is called mysite and I create a slot called staging then my slot will be an Azure Web App with the name mysite(staging) and its url will be http://mysite-staging.azurewebsites.net.

It's important to emphasize that the slot is in itself a regular Azure Web App, it will have its own app settings, connection string, any other configuration settings and even an scm site (https://mysite-staging.scm.azurewebsites.net).
In fact by default each Azure Web App has a single deployment slot called production which is the Azure Web App itself.
You can add more than one deployment slot.
The first feature of deployment slots is the Swap Slots and it's used for Staged Deployment

In short, the Swap operation will exchange the website's content between 2 deployment slots.
Later I'll explain what is swapped and what is not but note that swap is not about copying the content of the website but more about swapping DNS pointers.
So in our scenario we have the Production site with index.html that starts with Hello World and our staging slot has the same index.html but it starts with Yello World.
Before swap - http://mysite.azurewebsites.net/index.html will return Hello World...
After swap - http://mysite.azurewebsites.net/index.html will return Yello World...
Now to get this into a real life scenario.
Deploying your website in the traditional way, whether deploying via WebDeploy, FTP, git, CI or any other way, has weaknesses that may or may not concern you:
This is where staged deployment comes into play. Instead of deploying directly to our production website we create a deployment slot used for staging and we deploy our new bits there.
Then we "warm" our site (staging slot) by making requests to it and we can start testing our new bits verifying everything works as expected. Once we're ready we hit the Azure Portal's Swap button (or PowerShell/xplat cli command) and the slots will be swapped.
Our customers will not hit the "cold start" delay and we have more confidence in our new bits.
Since we want to test our website before going into production we have this manual step where we hit the Swap button to swap.
But if we only want to address the "cold start" delay we can configure the Auto Swap feature where the website automatically swaps a configured slot (in our case staging) with the Production slot after the deployment completes.
Currently auto-swap only works when deploying using WebDeploy (deploying through VS will usually use WebDeploy) and Continuous Integration (VSO, GitHub, Bitbucket). FTP and
git pushwill not cause an auto swap.Auto-swap can take a while to swap (1-2 minutes), until the swap completes any other attempts to deploy the website will fail.
To set this up you'll need to use the Azure PowerShell tool (download)
In PowerShell use the following command:
Set-AzureWebsite -Name mysite –Slot staging -AutoSwapSlotName production
This command will set Azure Web Apps to auto swap the staging slot into Production slot whenever staging is deployed.
You can use the operation logs in the (current) Azure portal to see the auto swap operation status.
One important concept to understand about deployment slots is how the configuration works.
A deployment slot is a full Azure Web App and as one it has all the same configurations as any Azure Web App. When you swap deployment slots there are some settings you actually need to keep with the slot and not swap them.
A setting that is not swapped is referred to as a setting that is sticky to the slot.
Some of the default settings that are sticky to the slot:
This also includes continuous integration settings - if you hooked your staging slot with a GitHub repository after a swap the hook will still exist between GitHub and the staging slot.
App settings and connection strings are not sticky to the slot and will remain with the website when swapped but we can configure selected app settings and connection strings to become sticky to the slot using a PowerShell command (not yet supported by the Azure portal).
Use this command in Azure PowerShell to set 2 app settings as sticky to the slot
Set-AzureWebsite -Name mysite -SlotStickyAppSettingNames @("myslot", "myslot2")
And this command to set 2 connection strings as sticky to the slot
Set-AzureWebsite -Name mysite -SlotStickyConnectionStringNames @("myconn", "myconn2")
Sticky to the slot configuration is website-wide configuration and affects all slots in that website.
Another great feature for deployment slots is the traffic routing also known as testing in production.
This feature will allow you to route traffic that is coming to your Azure Web App between your deployment slots based on percentage of the traffic.
This feature exists only in the new Azure preview portal.
In the portal under your website there is a tile called Testing in production, click on it to get to the "Testing in production" blade where you can direct traffic coming to your website between all of your deployment slots.

One usage scenario for this feature is A/B testing.
By default 100% of the traffic will go to the Production slot but you can create a new deployment slot with a slightly different version of your website (differs by what you want to A/B test) and add it there with a 50% value so 50% of your visitors will actually be served from the new slot.
Another scenario for this feature is having a dev slot that is a little less stable which gets 1% of the traffic so you can test feature currently being developed with real traffic.
For more information on this feature.
I hope that if the deployment slots were just a mysterious link/tile/concept before, you now know how to master them as they can bring lots of value to your production website.
Using Azure Web Apps includes many benefits that come just out of the box, you just need to know that they're there and how to use them properly. Logging is one of those benefits that integrate seamlessly to your Azure Web App.
Reference to the official Azure Web Apps Logging Document
In this post I'll show ways on maximizing the Azure Web Apps logging experience.
These are the different log types you can get for your Azure Web App:
Web Server Logging - Also known as http logs or iis logs, this will log all requests to your website in W3C Extended Log File Format.
Detailed Error Messages - Detailed version of the html files produced when your website responds with an error message. This is good to enable for debugging some error responses in your website. It is stored in the website's file system.
Failed Request Tracing - Also known as FREB, here you can get lots of information from IIS through its different stacks for each failing request. Note that these log files are also stored in the website's file system.
You can get some more information about FREB here.
Eventlog.xml - You may see this file sometimes under your LogFiles directory of your website (d:\home\LogFiles). This file contains ETW designated events, usually it is generated and populated with errors of some crash that occurred.
Kudu Traces - In your website's file system under d:\home\LogFiles\kudu\trace you can find the traces file for Kudu which drives some of the developer experience features of Azure Web Apps like: git deployment and WebJobs.
Application Logs - See detailed information on application logs in the next section.
Log files stored in the website's file system will show up under
d:\home\LogFiles.
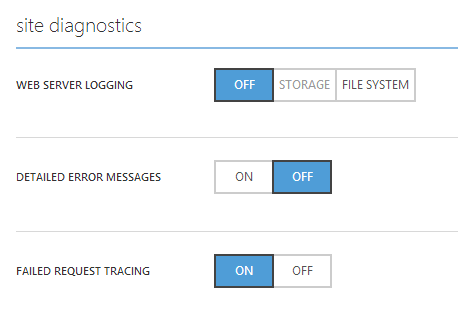
Setting different logs in the Azure portal
These are the logs coming from your Application/Service/Website/WebJob.
If you're using ASP.NET it's simple to write application logs, just use the Trace class, for example:
        Trace.WriteLine("Message"); // Write a verbose message
        Trace.TraceInformation("Message"); // Write an information message
        Trace.TraceWarning("Message");
        Trace.TraceError("Message");
In the Azure portal you can direct different verbosity levels to different targets (at the same time). The targets are: file system, Azure table storage and Azure blob storage.
For example you can have all Information level (and up including Warning and Error) logs go to Azure table storage and all logs (including Verbose and up) go to blob storage.

Setting application logs in the Azure portal
For node.js websites the way to write application logs is by writing to the console using console.log('message') and console.error('message') which goes to Information/Error level log entries. Currently the only supported target for the log files for node.js is the file system.
Other web site types like php and python are not supported for the application logs feature.
Triggered (Scheduled/On Demand)
Whatever is written to console output and console error will go to a log file for the specific triggered webjob run. You can see it on the WebJobs dashboard but the file itself is located under d:\home\data\jobs\triggered\{jobname}\{jobrunid}.
Continuous
Whatever is written to console output and console error will go to the application logs as log entries with log level Information/Error. The first 100 log entries when the continuous WebJob starts will also show up in the continuous WebJob log file that is available on the WebJobs dashboard.
The file itself is under d:\home\data\jobs\continuous\{jobname}.
.NET WebJobs
If you're using .NET console application as your WebJob, you can follow the same guideline as for an ASP.NET website. Once you use the Trace class, your traces are handled as application logs (including triggered WebJobs).
Here is the list of fields each application log entry consists of:
There are a couple a differences between logs stored in file system, table storage and blob storage:
Blob storage - Stored as a csv file with the following structure:
Timestamp(DateTime), Level, ApplicationName, InstanceID, Timestamp(Ticks), EventID, ProcessID, ThreadID, Message, ActivityIdTable storage - Each log entry is stored as a table entity, with a Partition Key that is the log's date (formatted as "YYYYMMDDHH") and a Row Key which is an ordered GUID to help get the logs in the same order as they happened.
File system - Has a subset of the fields mentioned in the following format:
{Date} PID[{Process ID}] {Event Type} {Message}
The activity id field can be very powerful. It can help you correlate all log entries which came from a single request.
The easiest way to use it is to enable Failed Request Tracing on the Azure portal. This will have a side-effect of setting an activity id for each request your website receives where the activity id will propagate to all your application logs.
The actual proper way to set the activity id would have been using this code in the
global.asax.csfile:public class MvcApplication : System.Web.HttpApplication { protected void Application_BeginRequest() { System.Diagnostics.Trace.CorrelationManager.ActivityId = Guid.NewGuid(); } }But since ASP.NET is doing some funky things, the activity id may get lost (become empty) when using async operations.
Note that the same activity id concept would work for .NET WebJobs. For that you should use: System.Diagnostics.Trace.CorrelationManager.ActivityId = Guid.NewGuid(); before an operation that requires an activity id.
File system
Log files will have some retention policy for each type:
Blob storage
Web server logs and application logs stored in blob storage can be configured with a retention policy for deleting log files older than X days.
One more cool feature that Azure Web Apps release recently is the Azure Site Extensions.
Azure site extensions is basically a gallery of extensions to your Azure Web App that can originate from Microsoft or from the community. These site extensions can be useful utilities for your website administration.
One of those site extensions is called Azure Website Log Browser.
The Log Browser makes it super easy for you to access all of your Azure Web App logs described here.
Features
The tool itself should be self-explanatory, just install and start using it.
Here are some screen-shots:
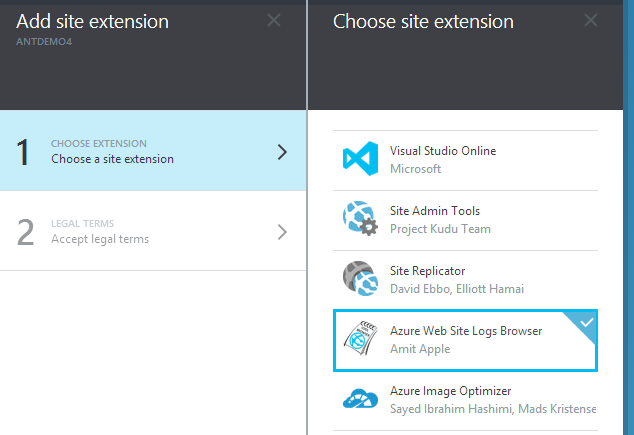
Install the Log Browser from the new Azure Portal
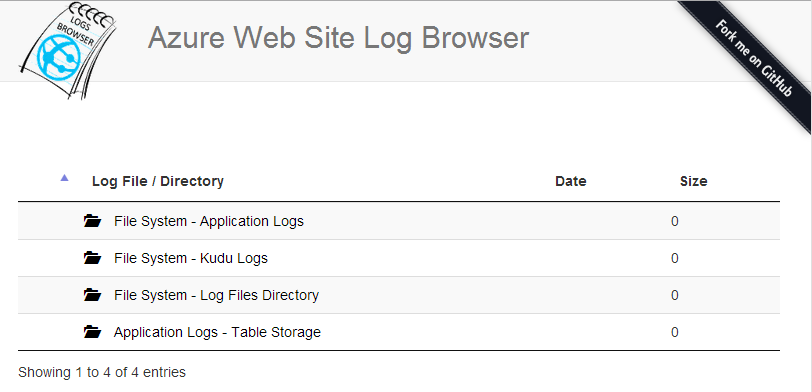
Main page

View a log file
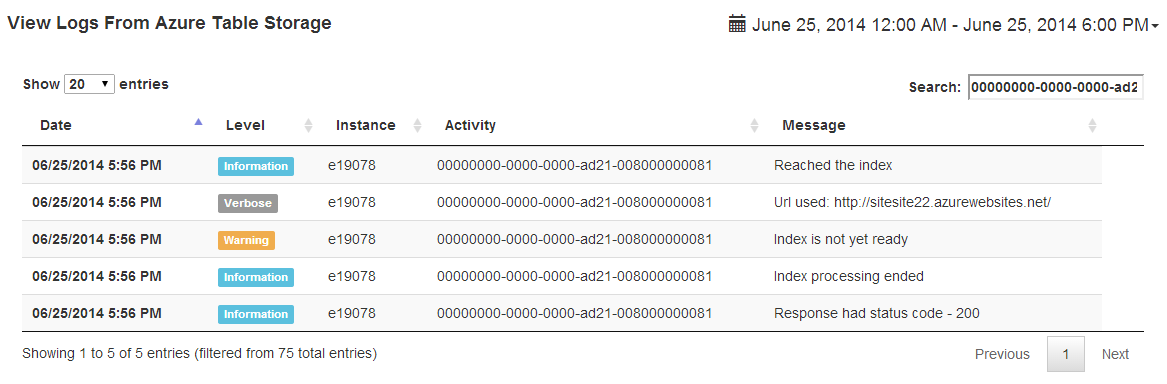
View log entries from table storage
The Log Browser site extension is open source and is hosted on GitHub. You can use this repository to help you get started on your own site extension idea or to contribute to the Log Browser site extension.
Azure Web Apps has a very nice and powerful logging experience, together with the Log Browser you get an online dashboard and log viewing experience for free and with minimal effort.