Blog by Amit Apple
Microsoft Teams is a collaboration and communication platform for organizations and teams that includes messaging, meetings, calls, file storage, application integrations and more.
Role-based messaging is contacting a person (or a group) based on their role instead of their name.
Some examples:

The way to achieve role-based messaging in Microsoft Teams is using a feature called Tags.
Tags in Microsoft Teams let users communicate with a subset of people on a team. Tags can be added to one or multiple team members to easily connect with the right subset of people. Team owners and members (if the feature is enabled for them) can add one or more tags to a person. The tags can then be used in @mentions by anyone on the team in a channel post or to start a conversation with only those people who are assigned that tag. (source)
You can think of Tags as a way to add a role to a team member, for example add the Assistant to the Regional Manager tag to Dwight. Or as a way to group members of a team, for example add the Party Planning Committee tag to Pam, Phyllis, Angela and Ryan.
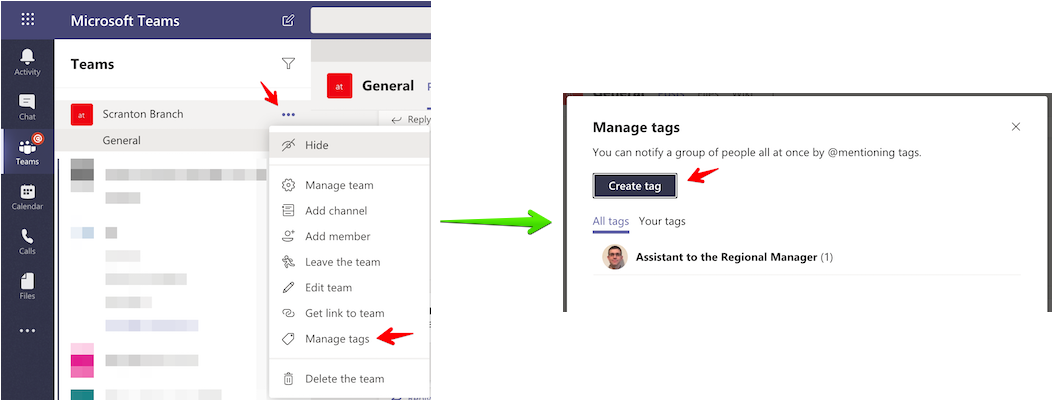
To manage tags in Microsoft Teams you need to click on the ... next to the team for which you want to manage tags. There, you should see the "Manage tags" menu item. Then click on the "Create tag" button and add the team members you want to that tag.

Note: You need to either be the team owner to manage tags for the team or the team owner can also configure all members of a team to be allowed to manage tags on the "Manage Team / Settings" screen.
In the "Manage Tags" menu, you'll be able to see existing tags and edit them by renaming a tag or adding/removing team members from a tag. If you remove all members from a tag, the tag will be removed.
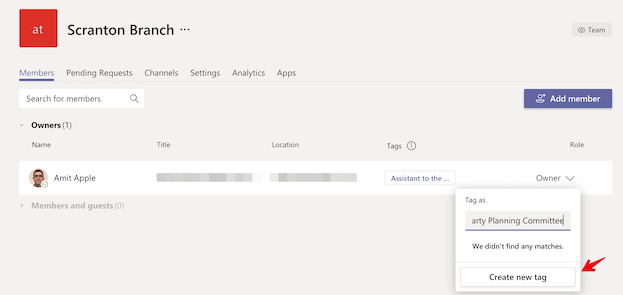
Another way to create a tag is on the "Manage team" screen where the view is team member centric instead of tag centric. There you can add 1 or more tags on a specific team member and see the different tags each team member has.

Once you have your tags/roles you can start using them when writing a channel message to send a notification to the right person by mentioning the tag.

Or by starting a chat conversation with the person (or people) with that tag.

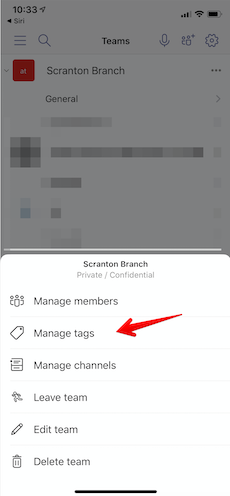
While this post describes how to manage and use tags on desktop/web, you can also do it on the mobile app in a similar way.

Writing logs is usually pretty easy in a project, just select/add your favorite logging framework (Trace, NLog, Log4Net, ...), maybe configure it a bit, and start writing logs.
But then comes the time when you actually need to use these logs, maybe to debug an issue, this is when you realize the mess: here is an error log but wait what happened before that, who was the user, what was the action and how long did it take... someone please put me in context!
Well there are current solutions for that, kinda, you'll need to go back to the code and start adding correlation ids, and use some logging query magic with grouping and filtering on top of what might be a high amount of logs. Not so easy after all, especially after the fact as you have enormous amount of logs and most of them are just noise.
What you really want to do is remove all the noise, but still have full logs when you need them (error case for example).
In this blog post I wanted to show a new approach to logging using a new framework called: Story.
Storytelling.Factory.StartNew("MyAction", () =>
{
    this.counter++;
    Storytelling.Info("added 1 to counter");
    Storytelling.Data["counter"] = this.counter;
});

// Output:
// 11/21/2015 5:01:20 PM
//   Story MyAction (a66feed7-112a-42fe-9a3f-329939151f23) on rule Trace
//   counter - 1
//
//   +1.9999 ms Info added 1 to counter
//
//   - Story "MyAction" took 3 ms
The story framework (currently only for .NET) is about collecting information (logs and any bits of data) about the currently running code and putting it inside a context and when this context ends using rules figure out what to do with this information collection (story).
Too abstract, lets use an example:
We have a web application for posting questions, in this approach every request will run under a new story context. This means that every log produced will be added to that story and every data will be added to it like the current user posting the question, the url of the request, the response and even the query we ran to insert the question to the database.
Then when the request ends and the story stops, a set of rules will decide what to do with it:
This gives you full control on your logs/telemetry/analytics at coding time, and the story you get, if there was an error for example, will have all the information you need, and more importantly, information (stories) that you don't need (usually most of them) will not distract you.
How cool is that?
Well these rules can also be updated on the fly which opens awesome scenarios, for example - your user has an issue, just add a rule that sends all his stories to a new storage container and observe that container, no need to filter and you see everything that this user do immediately.
To use the Story you need to create/start a new story and run your code within the context of that Story.
Storytelling.Factory.StartNew("MyAction", () =>
{
    // ... your code
    // and adding logs and information to the story
    Storytelling.Info("added 1 to i");  // log
    Storytelling.Data["i"] = i;         // data
});
The created story is added to the context (CallContext or HttpContext depending on where you run) so anything running within that context can just call Storytelling and add logs/data to the story.
We name the story ("MyAction" in this case) to help us later when we run rules on the stories.
You can also create new stories, which will be added as children to the current story in context (and will become the current story in the context) giving us an execution graph later when we observe the story.
The second part is setting the rules which tells each story what to do when it ends (and begins), for example:
// Create the ruleset
var ruleset = new Ruleset<IStory, IStoryHandler>();

// Add a new predicate rule, for any story run the console handler which prints the story to the console
var consoleHandler = new ConsoleHandler("PrintToConsole", StoryFormatters.GetBasicStoryFormatter(LogSeverity.Debug));
ruleset.Rules.Add(
    new PredicateRule(
        story => true,
        story => consoleHandler));

// Set a new basic factory that uses the ruleset as the default story factory
Storytelling.Factory = new BasicStoryFactory(ruleset);
You should initialize the factory once at the start of the app.
To get a better real sample I'll show how to add stories to an asp.net owin web application.
You can find the code demonstrated in this blog post in this github repository.
We'll start with a barebone owin web application and add the Story nuget package (nuget install story).
Then add a middleware that puts requests in a Story context.
public class StoryMiddleware : OwinMiddleware
{
    public StoryMiddleware(OwinMiddleware next)
        : base(next)
    {
    }

    public override Task Invoke(IOwinContext context)
    {
        var request = context.Request;
        return Storytelling.StartNewAsync("Request", async () =>
        {
            try
            {
                Storytelling.Data["RequestUrl"] = request.Uri.ToString();
                Storytelling.Data["RequestMethod"] = request.Method;
                Storytelling.Data["UserIp"] = request.RemoteIpAddress;
                Storytelling.Data["UserAgent"] = request.Headers.Get("User-Agent");
                Storytelling.Data["Referer"] = request.Headers.Get("Referer");

                await Next.Invoke(context);

                Storytelling.Data["Response"] = context.Response.StatusCode;
            }
            catch (Exception e)
            {
                var m = e.Message;
                Storytelling.Error(m);
                throw;
            }
        });
    }
}
To make sure all exceptions are handled properly (and not get lost in web api), we'll add an exception filter too.
public class ExceptionStoryFilterAttribute : ExceptionFilterAttribute
{
    public override void OnException(HttpActionExecutedContext context)
    {
        Storytelling.Warn("Internal error - " + context.Exception);
        var message = context.Exception.Message;
        var httpStatusCode = HttpStatusCode.InternalServerError;

        Storytelling.Data["responseMessage"] = message;

        var resp = new HttpResponseMessage()
        {
            Content = new StringContent(message)
        };

        resp.StatusCode = httpStatusCode;

        context.Response = resp;

        base.OnException(context);
    }
}
Add them to owin and web api.
public void Configuration(IAppBuilder appBuilder)
{
    // ...
    appBuilder.Use<StoryMiddleware>();
    // ...
    HttpConfiguration config = new HttpConfiguration();
    config.Filters.Add(new ExceptionStoryFilterAttribute());
    appBuilder.UseWebApi(config);
    // ...
}
Now, we can start using Story to collect information.
public Task<HttpResponseMessage> GetSomething()
{
    // We wrap a controller action with a (sub)story
    return Storytelling.Factory.StartNewAsync("GetUser", async () =>
    {
        var name = await fooService.GetRandomName();

        // Log to the story
        Storytelling.Info("Prepare something object");
        object something = new
        {
            Name = name
        };

        // Add data to story
        Storytelling.Data["something"] = something;

        return Request.CreateResponse(something);
    });
}

// Output:
// Selfhost.exe Information: 0 : 11/21/2015 5:42:42 PM
//    Story Request (774743a8-768e-4820-a76c-09a32fab6794) on rule Trace
//    RequestUrl - "http://localhost:2222/api/something"
//    RequestMethod - "GET"
//    UserIp - "::1"
//    UserAgent - "Mozilla/5.0 (Windows NT 6.3; WOW64) AppleWebKit/537.36 (KHTML, like Gecko) Chrome/46.0.2490.80 Safari/537.36"
//    Referer - "http://localhost:2222/"
//    Response - 200
//    something - {"name":"Smelly Zebra"}

//    +497.0671 ms Info Getting random name
//    +508.0291 ms Info Prepare something object

//    - Story "Request" took 815 ms
//      - Story "GetSomething" took 44 ms
We can also collect information in inner methods.
public async Task<string> GetRandomName()
{
    Storytelling.Info("Getting random name");
    await Task.Delay(10);
    return GetRandomItem(Adjectives) + " " + GetRandomItem(Animals);
}
Finally we need to initialize the story factory, we will use FileBasedStoryFactory which lets us update the ruleset on the fly. The ruleset itself is a class written in a file, to change it we change the code in that file and copy it over to the server.
The ruleset code file is stored in the project both as a source file (Compile) and as a content file (marked as "Copy Always") so it has the benefit of intellisense and used as an external file to the project.
// Startup.cs
public void Configuration(IAppBuilder appBuilder)
{
    Storytelling.Factory = new FileBasedStoryFactory(ConfigurationManager.AppSettings["StoryRulesetPath"]);
    // ...
}

// StoryRuleset.cs
public class StoryRuleset : Ruleset<IStory, IStoryHandler>
{
    public StoryRuleset()
    {
        IStoryHandler storyHandler =
            StoryHandlers.DefaultTraceHandler.Compose(
            new AzureTableStorageHandler("AzureTable", azureTableStorageConfiguration));

        Rules.Add(
            new PredicateRule(
                story => story.IsRoot(),
                story => storyHandler));
    }
}
You'll notice we've added both a story handler that sends stories to the Trace and one that sends stories to the azure table storage. To make the second one work you'll need to add a connection string for your azure storage account with the name "StoryTableStorage" (can be in the web/app.config or the azure portal settings if using azure).
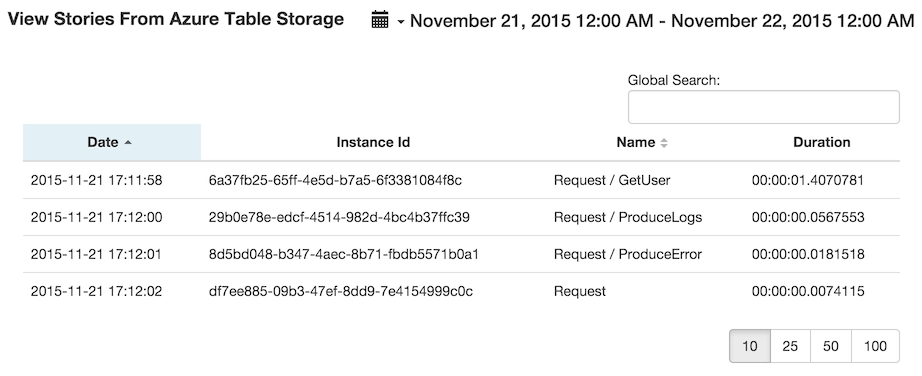
If you use the azure table storage story handler to persist your stories and also use Azure Web Apps to deploy your web application you can install the Azure Websites Log Browser (blog post here) which now supports viewing your stories in a readable way.

You can find the full sample app here on github.
It also has a Deploy to Azure button if you want to try it out on the cloud and try out the log browser site extension, just make sure to set the azure storage connection string (when asked). To access the log browser, go to: https://{sitename}.scm.azurewebsites.net/websitelogs/.
You can find more information about the Story framework here.
Scheduled WebJobs have existed from the beginning of Azure WebJobs, they are a result of combining 2 different Azure resources: a triggered WebJob containing the script to run and an Azure Scheduler job containing the schedule to use.
The Azure Scheduler job would point to the triggered WebJob invoke url and would make a request to it on schedule.
There have been some difficulties with this approach mainly around the deployment part of the schedule which convinced us to build another scheduler implementation that is built into kudu (the WebJobs host) which enables a scheduled WebJob to be deployed by simply adding a file with the WebJob binaries.
The way to add a schedule to a triggered WebJob is by adding a file called settings.job with the following json content: {"schedule": "the schedule as a cron expression"}, this file should be at the root of the WebJob directory (next to the WebJob executable).
If you already have this file with other settings simply add the
scheduleproperty.
The schedule is configured using a cron expression which is a common way to write schedules.
There are many pages that can teach you how to write a cron expression, I will describe the main format used for the scheduled WebJob.
{second} {minute} {hour} {day} {month} {day of the week}., - * /0 0 13 * * * - 1pm every day.0 15 9 * * * - 9:15am every day.0 0/5 16 * * * - Every 5 minutes starting at 4pm and ending at 4:55pm, every day.0 11 11 11 11 * - Every November 11th at 11:11am.You can find some more cron expression samples here but note that they have 5 fields, to use them you should add a 0 as the first field (for the seconds).
Important - To use this way of scheduling WebJobs you'll have to configure the website as Always On (just as you would with continuous WebJobs) otherwise the scm website will go down and the scheduling will stop until it is brought up again.
To see the scheduler logs for a scheduled WebJob you need to use the get triggered WebJob api, go to the url: https://{sitename}.scm.azurewebsites.net/api/triggeredwebjobs/{jobname} (remove the job name to see all triggered WebJobs).
You will receive the following json result:
{
    name: "jobName",
    runCommand: "...\run.cmd",
    type: "triggered",
    url: "http://.../triggeredwebjobs/jobName",
    history_url: "http://.../triggeredwebjobs/jobName/history",
    extra_info_url: "http://.../",
    scheduler_logs_url: "https://.../vfs/data/jobs/triggered/jobName/job_scheduler.log",
    settings: { },
    using_sdk: false,
    latest_run:
      {
        id: "20131103120400",
        status: "Success",
        start_time: "2013-11-08T02:56:00.000000Z",
        end_time: "2013-11-08T02:57:00.000000Z",
        duration: "00:01:00",
        output_url: "http://.../vfs/data/jobs/triggered/jobName/20131103120400/output_20131103120400.log",
        error_url: "http://.../vfs/data/jobs/triggered/jobName/20131103120400/error_20131103120400.log",
        url: "http://.../triggeredwebjobs/jobName/history/20131103120400",
        trigger: "Schedule - 0 0 0 * * *"
      }
}
The scheduler_logs_url property has a url that will get you the scheduler log, that log will tell you some verbose information on the scheduling and invocation of the triggered WebJob.
There is also a trigger property for a triggered WebJob run that tells you which schedule (or external user agent) invoked the specific run.
More information about WebJobs API.
If you have a Visual Studio Azure WebJob project, the way to add a schedule is by authoring the settings.job file described above and adding it to the project.
In the solution explorer you'll need to change the properties of that settings.job file and set the Copy to output directory to Copy always.
This will make sure the file is in the root directory of the WebJob.
Changing (or setting/removing) a schedule of a triggered WebJob is all about updating the
scheduleproperty of thesettings.jobfile in the WebJob's directory (d:\home\site\wwwroot\App_Data\jobs\triggered\{jobname}), whenever the file is updated the change is picked up and the schedule will change according.This means you can deploy the schedule in any way you wish including by updating the file on your git repository.
There are pros and cons to each way of scheduling a WebJob, review them and choose which way to go.
Pros
Cons
Pros
Cons
To summarize, we've introduced a new way to schedule WebJobs that is continuous deployment friendly, in some cases it won't be the right one to choose but if the cons doesn't bother you it is a simpler and way for you to schedule triggered WebJobs.
Please let us know how it works for you in the comments or better yet on kudu project issues.